Half cleaned filthy AC evaporator coil

Professionally Cleaning an RV Rooftop Air Conditioner

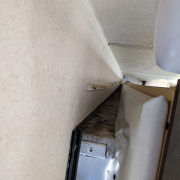
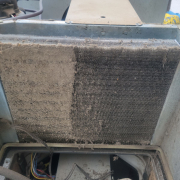
The picture attached to this post is what we found while servicing a rooftop air conditioner for someone who thought they were properly maintaining it. They stopped by to ask if the AC special we posted on our sign included “anything special” because every month during the summer, they washed the air return filters and sprayed off the condenser coil with a hose (without removing the outer cover). They were a little shocked to learn exactly how much is involved in a real semiannual AC service. The attached picture is of the evaporator coil, which is the coil you can see looking up through the air return on units with an exposed “bottom unit”. It obviously needed our help.

Here is a rundown of the things we clean and check when doing semi-annual maintenance on a rooftop air conditioner, regardless of brand. The list isn’t exhaustive because some units have extra features like condensation pumps which require extra steps.

  1. Remove the rooftop cover, remove any debris, especially wasp/dirt dauber nests. These pests can block airflow and airflow is everything.
  2. Measure the compressor amp draw at start and run. High loads can indicate impending compressor failure, low loads can indicate low refrigerant.
  3. Measure the “Delta T”, the difference between intake air temperature and cooled air temperature. This should be around 22 degrees in most cases, but if it’s higher than 30 degrees, it’s probably a sign of air leaking between the intake and cooled sides. If it’s lower than 20 degrees, it’s probably a sign of bad airflow through the unit. (These temperatures vary with humidity!)
  4. Measure the “Delta I”, the difference between the ambient air outside the intake, and inside the intake. A difference of more than 2 degrees means air is leaking between the intake and cooled sides and the leak must be found and taped or otherwise sealed.
  5. Inspect for oily residues. Refrigerant leaks leave behind the oil used to lubricate the compressor.
  6. Check the condenser fan blade spins freely. Fan motors have brushes and bearings which wear over time.
  7. Clean the condenser coil and straighten any fins which can be straightened without causing further damage. There are several no-rinse condenser coil cleaners on the market. Our favorite has a brush built into the cap which also helps to straighten fins. Every square inch of blockage or restriction adds up to loss of cooling efficiency and puts extra load on the fan and compressor.
  8. Remove the evaporator shroud, noting any gaps which would allow air to pass through the shroud. Remove any debris.
  9. Expose the capacitors then discharge, disconnect, and check tested capacitance against rating. Double check correct capacitors are installed. The best chance of saving a fan motor or compressor is to catch a failing capacitors as soon as possible. A bad capacitor will burn out a compressor given enough time. Replace any that are not up to spec.
  10. Clean the evaporator coil and straighten any fins which can be straightened without causing further damage. There are several no-rinse evaporator coil cleaners on the market. Our favorite is anti-fungal, anti-viral, anti-bacterial, and fresh scented. Just like the condenser coil, every square inch of blockage or restriction adds up to loss of cooling efficiency and puts extra load on the fan and compressor.
  11. Check the wiring connections. Loose connections can lead to arching which can start a fire, damage components, or cause intermittent function. Considering there is an earthquake/hurricane with every move, loose connections are more common than you might think. (This is also a great time to check the connections in the breaker box and other fire hazard locations!!)
  12. Replace the shroud, being extra careful to tape all gaps. A lot of factory installs will have a little piece of tape on the corners, but it’s just tape: tape the full seams!
  13. Clean or replace the air return filters inside.
  14. Retest the Delta T and Delta I to make sure everything is working properly. Under normal usage in just about all parts of the country, if the last cleaning was 6 or more months ago, there will be an improvement.

Of course, when we do it, we like to write up our findings so the owner can keep the health stats in their maintenance records. If you do this job yourself, pretend for a moment you’re issuing yourself a report, be detailed, and put it with your maintenance records. Being able to look back at prior tests for a trend is sometimes very helpful and having good maintenance records can also increase the value of your camper when it’s time to sell or trade!

A slide seems misaligned

Should You Put Your Camper Up on Blocks?

When we first saw the slide out room on this mid-sized travel trailer, it seemed like the slide needed adjustment. The owner mentioned the slide had become harder and harder to move during the last year, even requiring extra people to push on the slide to get it to move. This was the beginning of a “purple monkey” from hell and if we ever felt like there was a threat to our 100% problem resolution rate, this became it. This story is about wasting a ton of time and learning yet again, never draw a conclusion and then ignore additional evidence. It’s also about, as the title implies, the hazards of improper stabilizing, bracing, pseudo foundation laying, or any other thing that attempts to hold a camper level/still or “take the weight off” when it’s parked. This is especially true of campers, like this one, which are parked permanently or semi-permanently at a seasonal or other long-term spot.

There was a total of about 8 hours wasted on this job. The list below is just the actions taken, not the result of the action, because the result was always the same: The slide did not retract and slightly pivoted on the arm towards the rear of the camper, furthest from the actuator.

  • Adjusting the slide mechanisms to properly align the slide in the wall, which appeared rotated slightly counterclockwise.
  • Disengaging the actuator arm (aka thruster) from the slide to check the motor function.
  • Lifting the slide with jacks to clean and clear debris from the ramp along the bottom where the slide slides across the threshold of the wall into the camper, which had a lot of sand and even some gravel trapped in it.
  • Lots and lots (and lots and lots) of penetrating oil on the slide arm tubes which showed quite a bit of rust.
  • Removing the gear packs to relieve a possible bind from bad left/right timing.
  • Disengaging the slide arms from the slide wall to move them in and out to be sure they weren’t rusted in place. (Both arms moved freely.)

This list took place over a series of days with a “stop and think about it” in between. We consulted with colleagues who made suggestions and bounced around ideas. That part was not successful because we did not give our colleagues the one vital piece of information which would eventually solve the puzzle. At the end of this list, we pretty much apologized to the “customer”, who, to make matters worse, is also a personal friend. Days went by and as I (Steve) tend to do, I obsessed over it, going over every detail over and over in my head.

We dropped in to see the friend socially several days later and of course conversation came back around to the slide situation and what to do about it at the end of the camping season when the slide would normally be retracted for winterization. It was then that the most eye-opening stroke of luck happened. My friend decided to check again to see if the slide was still stuck but pressed the wrong slide switch. The kitchen slide was also now stuck! We’d all been having drinks, so we all agreed we’d look into this further tomorrow. My first thought was that I’d somehow screwed up the kitchen slide while doing all the work on the living room slide, which is exactly across from it.

The next day, it was time to throw out the bath water, so to speak, and start on this with fresh eyes. This approach to solving this kind of elusive problem has worked in RV repair and every other endeavor since the very first time, decades ago, I realized I had duped myself with confirmation bias. I had decided there was something wrong with the slide mechanism and then bent everything I saw to fit that decision. With fresh eyes on the shocking evidence that now both slides were jammed, it was time to have a look around for a better opinion.

That’s when I finally saw the jack stands under the camper as a potential threat. These jack stands were sitting on extremely sandy ground, and it had been an unusually rainy spring. The stands were positioned at the very front and very back of the frame rails, potentially creating the maximum twist on the frame possible if they were to become uneven. We told our friends to get those jack stands out from under their camper and see how the slides behaved. If you guessed the problem was magically solved, you guessed correctly.

The question in the title, “Should you put your camper up on blocks?”, is misleadingly oversimplified. There are times when it’s a great idea and also times when it is a prelude to disaster. First, it’s important to understand the difference between putting supports under the frame rails and under anything else, especially under slide outs.

This might generate some hate but putting supports under slide out rooms is an absolute never, ever. The frame and walls are designed to have that weight permanently and the risk of even a minor shift in the supports, the ground, the position of the frame, or the tides of the ocean, can cause much more damage than “the weight of the slide out”. In short: STOP DOING THIS.

Second, supporting the frame can be a good idea if it meets three requirements. The supports must be equal, meaning exerting an equal force at every point they meet the frame. This may or may not be perfectly level if the frame is not perfectly plumb. It must be direct support with the jacks or blocks resting directly under the frame rail, not outriggers, suspension components, or crossmembers. The supports must not be able to move relative to each other. “Relative to each other” pretty much means the ground can’t sink leaving the supports out of balance in the force distribution on the frame. It was this last one that actually twisted the entire camper out of shape and trapped the slides in the walls in our friend’s case.

We hope you enjoyed our embarrassing story and took the two important lessons to heart. If you’re going to use supports, use them correctly, and much more importantly, never let an assumption overrule evidence.

Stay safe out there!