Two cheerful vacationers

A Quick Note After Vacation

Hello and welcome back (to us) from vacation! We decided to pop a quick note in the journal to refer back from other entries which we’re going to do retrospectively for the summer months of 2022. We didn’t write anything up because we were BUSY. Crazy busy. The kind of busy that leaves you absolutely exhausted with no time to even remember you have a journal. So, we’re going to go back and pick the most interesting or informative job from each month and fill the gap.

As for the vacation itself, it was a mixed bag. We decided to go to Key West, FL, this year. We’ve never been and watching all our travel YouTube channels, it seemed like a cool thing to do for a week. Sadly, it was not a great location for us. We ate, drank, walked, rode, drove, and stumbled our way all through that little island, and the hard fact was we were paying way too much for unexceptional experiences. On the upside, we did make it down to Bahia Honda (bay-ee-uh own-duh) State Park for a little snorkeling on the last day, but we can’t credit that to Key West. BH is a reasonable day trip from Homestead and doesn’t require the $150+/night campground on Stock Island.

It was, nonetheless, a very helpful break. We got so incredibly bored by the end of day 4, we went to Publix, bought groceries, and basically opted out of the rest of the island. We also got so incredibly bored, we accidentally rested up. When the trip was over, all of the sudden there was a burst of productivity and lots of nagging old items on the to do list suddenly found themselves handled. The vacation may not have been worth the money, but it definitely accomplished something.

If you do happen to visit Key West, I will say the only two worth-it food experiences we had the whole time we were there (out of $1400 in restaurants and bars) were Roostica on Stock Island and Croissants de France de Stock Island. Roostica is a very interesting place to get wood fired pizza. We happened to be there on “gravy night”, which is a spaghetti dinner special. Don’t be alarmed by the absence of pepperoni from their menu because they absolutely have pepperoni pizza. They use a special salami in place of pepperoni and, trust me, you won’t be disappointed. As for the Croissant place, it was a little pricey, but their sandwiches were definitely not something you’d find at a common deli.

So here we are. Rested, poorer than we expected (if you missed it, go check out the October entry), and ready to have a great year.

Hope to see you out there sometime soon!

Top of the engine head with rockers and injectors

Boondocking for 17 Days in a Diesel Shop Parking Lot

This note is going to be a little different because it’s about a repair to our own camper performed by someone else. I’m going to be pretty specific about some of the details, but before you bounce off the article, know that the reason this repair took 17 days was solely the fault of our aftermarket warrantee company and their repeated attempts to get us to pay for this expensive repair ourselves.

I’m going to resist the urge to launch into a technical expose of the rig, the leaky injector harness socket, and the sticky injectors which caused us to need thousands of dollars of repairs on the engine. I’ll keep it to two main points, instead.

The first point is if you have no choice but to let a motorhome sit, you should just sell it. Some people will take exception to this, but these things are made to roll. (If it’s a long-term spot at a campground, you’d probably be happier with a fifth wheel or park model anyway.) Both the leaky injector harness and sticky injectors, which both happened right around 100k miles on the odometer, were way too soon for this type of engine. According to a two different master diesel mechanics, the problem was sitting for well over a year at some point in the motorhome’s existence before we acquired it. A sit that long allows all the oil drain out of the engine. There’s more to the chemistry, but that’s the layman’s version. The consequence was the seals shrinking and cracking on the wiring harness and the injectors developing considerable mechanical and hydraulic resistance.

What is the right way to address “exercising” a motorhome engine when you’re stationary for a long time? Most diesel engines consider starting more than 36 hours after being turned off “extreme operating conditions”, so from a certain standpoint, recreational use will never be enough for the design of these big motors. If you’re going to start them up, once every month seems to be the interval to keep them oiled enough to be shelf stable as long as the starting temperature of the block and the outside air temperature are both above 40 degrees. Starting them more often than that, if they’re stationary, is just more instances of “extreme operating conditions”.

Starting them when they’re really cold should just not be done unless it’s time to get on the road. If you’re going to start it, let it come up to temperature. To get a diesel up to temperature, you’re going to have to use the high-idle function of your cruise control. The trick is to let it low idle until the oil pressure comes down to just above the normal operating level (on ours, to 50psi). Then bump it and wait on the pressure to come down again. Most big diesels need to turn at least 1200 RPM to avoid damage to the turbo and injectors. A mechanic actually recommended our Caterpillar C-9 turn 1400 RPM at idle. The problem with idling low is “glazing” – the build up of varnish from incompletely burned diesel passing through the cylinders, valves, and especially the turbo charger. Long story short, just bump up the idle as soon as the oil pressure is low enough to not stress the system.

Hydraulic leveling controller

Oh NO! It Wasn’t the Board! Except, It WAS the Board. LOL

In yet another episode of Adventures with the Purple Monkey, we once again explore what happens when you expect an outcome, but you don’t get it.

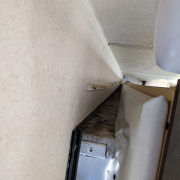
First, we’ll set the stage. We were called out to a private residence where a fifth wheel was “stuck” in the owner’s yard, they believed due to locked up brakes. Upon arrival we observed the recent generous rains had allowed the wheels of the camper to sink into the ground several inches. The wheels on the camper did not turn as the truck had managed to pull it a few feet, but instead plowed up the ground, pushing the displaced sod and dirt in front of the wheels and leaving them in quite a hole. The owner did the smart thing and got an expert involved when faced with this unfamiliar situation. Just hooking a tractor to the truck and pulling could’ve caused serious damage to the suspension (at the very least).

The way we fixed the situation will generate some hate, but we used the rear jacks to lift the wheels out of the holes. This was a safe option because several requirements for this kind of move were met (the throw required to clear the ground was short, the jacks weren’t sinking on blocks to spread the pressure, the jacks were oversized for the camper, etc). You shouldn’t try this move yourself without knowing exactly how the jacks can be damaged and avoiding it. Also, you definitely don’t want to create a situation where the camper could bend a jack and fall on something or someone. That’s a life safety warning to be taken seriously.

Once the wheels were up, the first order of business was confirming our suspicion that the brakes were not locked up. To the owner’s complete amazement, they spun freely. If you’ve never tried to pull a heavy camper on wet ground, be prepared for this effect. With several thousand pounds resting on the wheel bearings, they don’t turn as easily as they do when suspended. When on slick wet grass, sand, or mud, if the friction between the ground and the tire is less than the friction at the wheel bearing, the wheel just drags along. We’ve seen it on our own fifth wheels many times.

Next was to get this camper out of the yard and onto the driveway. To do this, we simply used lumber under the wheels to get them up out of the holes and provide a ramp for them to travel past the troubled spot. Note that none of this would’ve worked if the ground were still saturated (it was now several days after the owner’s initial attempt) without building a little road under each wheel track all the way to solid ground.

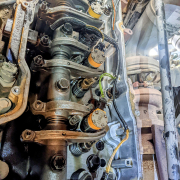
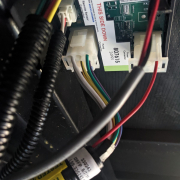
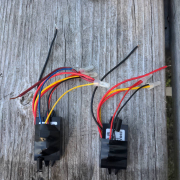
After we got the camper onto the driveway, the next phase of the operation started. The owner disconnected the truck from the camper and showed us the second complaint: auto-level failed. The hydraulic motor ran for a while, but nothing at all moved. The starting position was from hitch level with nose high, so the first phase of auto-level to drop the nose wasn’t working. Here’s where things got a little weird. The owner then reported that manual mode didn’t work on the outside control panel, so we went to the inside panel. We knew there wasn’t a problem with the hydraulic valves because we’d used every single jack to get the camper hitched and pulled out of the hole. We experimented with manual mode and discovered the zero point was good and the camper could be leveled manually. I called LCI for confirmation and they agreed: It had to be the control board. The smoking gun was the outside control panel not working.

This was an aftermarket warrantee job, so we had to get approval for the replacement of the controller, which wasn’t cheap. LCI didn’t mention to us the model of controller we were replacing was deprecated in favor of a new one. We got approval and order the updated version. When it arrived and we installed it, we found the second thing LCI didn’t tell us: Upgrading the leveling controller to the new version meant needing to upgrade the touch screen interface to the new version as well! This was very annoying to us, but much more annoying to the warrantee company. After verifying our reason for adding an extra $1000 to the repair quote, they approved it. We had waived the second trip fee, which was not covered under warrantee, but now a third trip was required that was really LCI’s fault. We didn’t think it was right to charge the customer, so that’s two trip charges unpaid if you’re keeping track.

What happened next was just what happens when you’ve already had too much of a situation and just want it to be over. If we’d gone out there like it were any other day on the job, it would’ve gone differently because we would’ve had our critical eyes on everything and not the blinders of “let’s get this over with”. We installed the new display and it finally saw the new leveling controller. But, to our complete dismay, when attempting to auto-level, the hydraulic pump would run for a while and the attempt to level would fail! W.T.H?! We reset the zero point and tried again. FAIL! Were we finding, after three trips and a couple thousand dollars in parts it wasn’t a problem with the board and we missed the real problem?! This was turning into a nightmare fast.

We called LCI tech support (which is quite good, BTW) and they walked us through trouble shooting. To our complete embarrassment, they solved the problem by simply forcing us to notice the camper didn’t have enough room to do the required 3 inch below level nose drop that starts the whole leveling process because the owner had put Anderson cans under the landing gear. Then the lightbulb went off that the behavior was indeed NOT the same. Originally, the gear didn’t move at all and there was plenty of room for a nose dip if it had. With the new controller, the nose dipped, but stopped when the gear couldn’t go any further. To confirm, we hitched to the truck, removed the cans, and BOOM! It worked. Of course. The outside control panel now also worked.

If you’ve read many of our blog entries, you might see a pattern with the Purple Monkey episodes. It’s never that there is some mysterious force working against the situation. It’s always that something hasn’t been seen, or worse, has been seen, but has been ignored.

The lesson remains the same: Be careful what you expect because it doesn’t really mean much compared to what is real.

(NOTE: To be absolutely clear, no customer is ever asked to pay for the time it takes us to sort out our own learning experiences. We always look at how long a job should take much more than how long it actually took.)

Dicor sealant breach

Q: Dicor Is a Sealant, Right? A: No, Not in the Context of an RV.

We did a lot of roof jobs this summer. We used many tubes of Dicor 501. But why? What is the Dicor supposed to be doing? Most people, even RV repair techs, think of Dicor 501 Self-Leveling LAP Sealant as a… wait for it… sealant. It says so right on the label, right? So, what is this stuff, really, and why is it drizzled all over your camper’s roof?

For brevity, I’m going to call “Dicor 501 Self-Leveling LAP Sealant”, as well as its non-sag version, just plain “Dicor”. Be aware, however Dicor is a brand that has many other products in 10.5-oz calk gun tubes. Most of them have the same thing in common: They are heavy in solvents. Solvents evaporate very quickly at first, causing the substance to “set up”. The evaporation of the solvent slows more and more, but never actually stops until it’s all gone. This is why fresh Dicor is like puffy bubble gum, but old Dicor is chalky, cracked, and flakes away easily.

What happens if you try to seal something with a chalky, cracking substance? Of course, it leaks. But here’s the interesting thing: The Dicor on an RV roof isn’t actually sealing anything (if the manufacturer was doing their job). Under the Dicor, wherever you find it, there is an actual sealant. Sometimes it’s a waterproof adhesive, sometimes it’s butyl (like window putty), sometimes it’s a flexible adhesive like Lexel, sometimes it’s a Sikaflex product (read up on those on your own), and sometimes it’s even plain old silicon.

A BREAK FOR A SERIOUS WARNING: DO NOT EVER, E.V.E.R. put silicon on an RV unless it was already there from the manufacturer. Nothing will ever stick to that spot again except silicon without stripping the material completely. In most cases, that means destroying a piece of your camper to undo the mistake! Ok, back to our program….

If it’s not sealing things, then what is the Dicor doing up there slathered all over everything in sight? It is actually acting as flashing, the term for anything that redirects water away from water sensitive areas. The reason for flashing is not to create a seal, but to protect one from water.

Water is one of the most destructive substances on Earth. It sounds weird but think about the Grand Canyon for a minute. Water is abrasive, acting as more or less super-fine-grit sandpaper in flowing liquid form. Water is chemically active, aiding in all sorts of oxidative processes like rust. Water has a tendency to rehydrate any sort of water-based adhesive over time making it no longer adhesive. And most dramatically, water expands when it freezes. This last point has led to the absolute obliteration of many campers (including one of our own) when a roof leak sprang in storage over the winter and water made it into the wood. The water literally explodes the wood fibers away from each other as it freezes and expands destroying the structural integrity of the wood.

Taking all this information in and jiggling some thought with it, it’s pretty easy to arrive at a conclusion about water leaks on a camper: If the leak has happened, it’s not just because the Dicor failed, but also because the REAL seal under it failed too. This means to reliably stop the leak, it’s not just about replacing the Dicor, but also about repairing the broken seal under the Dicor. Otherwise, it’s only a matter of the solvent evaporating before the leak returns. Sometimes, especially on older campers with severe damage, this kind of repair is the best because it is the most cost effective, but it’s never permanent. Doing this kind of “repair” on a newer camper is just sealing the fate (see what I did there?) of the camper.

Having said all that, the first line of defense is the flashing. In many ways, keeping that flashing viable is the single most important thing to keeping your camper from literally falling apart. An inspection schedule of at least twice a year is needed just about everywhere in the world for different combinations of environmental factors (e.g. sun, freezing, etc).

Almost all campers also have a generous supply of exposed sealant. Most campers have many seams which are sealed with silicone or silicone-like substances like Lexel. If you touch up one of those surfaces, make sure you know which it is and heed my warning above about silicone. Because a camper goes through an earthquake and a hurricane every time it moves, we inspect our own as part of the setup process when we arrive and, if we’ve seen freezing, heavy weather, or been stationary for more than a couple weeks, we inspect it again before we leave. We highly recommend you do the same. It’s all about keeping the rain in the outdoors!

Stay safe out there!

Half cleaned filthy AC evaporator coil

Professionally Cleaning an RV Rooftop Air Conditioner

The picture attached to this post is what we found while servicing a rooftop air conditioner for someone who thought they were properly maintaining it. They stopped by to ask if the AC special we posted on our sign included “anything special” because every month during the summer, they washed the air return filters and sprayed off the condenser coil with a hose (without removing the outer cover). They were a little shocked to learn exactly how much is involved in a real semiannual AC service. The attached picture is of the evaporator coil, which is the coil you can see looking up through the air return on units with an exposed “bottom unit”. It obviously needed our help.

Here is a rundown of the things we clean and check when doing semi-annual maintenance on a rooftop air conditioner, regardless of brand. The list isn’t exhaustive because some units have extra features like condensation pumps which require extra steps.

  1. Remove the rooftop cover, remove any debris, especially wasp/dirt dauber nests. These pests can block airflow and airflow is everything.
  2. Measure the compressor amp draw at start and run. High loads can indicate impending compressor failure, low loads can indicate low refrigerant.
  3. Measure the “Delta T”, the difference between intake air temperature and cooled air temperature. This should be around 22 degrees in most cases, but if it’s higher than 30 degrees, it’s probably a sign of air leaking between the intake and cooled sides. If it’s lower than 20 degrees, it’s probably a sign of bad airflow through the unit. (These temperatures vary with humidity!)
  4. Measure the “Delta I”, the difference between the ambient air outside the intake, and inside the intake. A difference of more than 2 degrees means air is leaking between the intake and cooled sides and the leak must be found and taped or otherwise sealed.
  5. Inspect for oily residues. Refrigerant leaks leave behind the oil used to lubricate the compressor.
  6. Check the condenser fan blade spins freely. Fan motors have brushes and bearings which wear over time.
  7. Clean the condenser coil and straighten any fins which can be straightened without causing further damage. There are several no-rinse condenser coil cleaners on the market. Our favorite has a brush built into the cap which also helps to straighten fins. Every square inch of blockage or restriction adds up to loss of cooling efficiency and puts extra load on the fan and compressor.
  8. Remove the evaporator shroud, noting any gaps which would allow air to pass through the shroud. Remove any debris.
  9. Expose the capacitors then discharge, disconnect, and check tested capacitance against rating. Double check correct capacitors are installed. The best chance of saving a fan motor or compressor is to catch a failing capacitors as soon as possible. A bad capacitor will burn out a compressor given enough time. Replace any that are not up to spec.
  10. Clean the evaporator coil and straighten any fins which can be straightened without causing further damage. There are several no-rinse evaporator coil cleaners on the market. Our favorite is anti-fungal, anti-viral, anti-bacterial, and fresh scented. Just like the condenser coil, every square inch of blockage or restriction adds up to loss of cooling efficiency and puts extra load on the fan and compressor.
  11. Check the wiring connections. Loose connections can lead to arching which can start a fire, damage components, or cause intermittent function. Considering there is an earthquake/hurricane with every move, loose connections are more common than you might think. (This is also a great time to check the connections in the breaker box and other fire hazard locations!!)
  12. Replace the shroud, being extra careful to tape all gaps. A lot of factory installs will have a little piece of tape on the corners, but it’s just tape: tape the full seams!
  13. Clean or replace the air return filters inside.
  14. Retest the Delta T and Delta I to make sure everything is working properly. Under normal usage in just about all parts of the country, if the last cleaning was 6 or more months ago, there will be an improvement.

Of course, when we do it, we like to write up our findings so the owner can keep the health stats in their maintenance records. If you do this job yourself, pretend for a moment you’re issuing yourself a report, be detailed, and put it with your maintenance records. Being able to look back at prior tests for a trend is sometimes very helpful and having good maintenance records can also increase the value of your camper when it’s time to sell or trade!

A slide seems misaligned

Should You Put Your Camper Up on Blocks?

When we first saw the slide out room on this mid-sized travel trailer, it seemed like the slide needed adjustment. The owner mentioned the slide had become harder and harder to move during the last year, even requiring extra people to push on the slide to get it to move. This was the beginning of a “purple monkey” from hell and if we ever felt like there was a threat to our 100% problem resolution rate, this became it. This story is about wasting a ton of time and learning yet again, never draw a conclusion and then ignore additional evidence. It’s also about, as the title implies, the hazards of improper stabilizing, bracing, pseudo foundation laying, or any other thing that attempts to hold a camper level/still or “take the weight off” when it’s parked. This is especially true of campers, like this one, which are parked permanently or semi-permanently at a seasonal or other long-term spot.

There was a total of about 8 hours wasted on this job. The list below is just the actions taken, not the result of the action, because the result was always the same: The slide did not retract and slightly pivoted on the arm towards the rear of the camper, furthest from the actuator.

  • Adjusting the slide mechanisms to properly align the slide in the wall, which appeared rotated slightly counterclockwise.
  • Disengaging the actuator arm (aka thruster) from the slide to check the motor function.
  • Lifting the slide with jacks to clean and clear debris from the ramp along the bottom where the slide slides across the threshold of the wall into the camper, which had a lot of sand and even some gravel trapped in it.
  • Lots and lots (and lots and lots) of penetrating oil on the slide arm tubes which showed quite a bit of rust.
  • Removing the gear packs to relieve a possible bind from bad left/right timing.
  • Disengaging the slide arms from the slide wall to move them in and out to be sure they weren’t rusted in place. (Both arms moved freely.)

This list took place over a series of days with a “stop and think about it” in between. We consulted with colleagues who made suggestions and bounced around ideas. That part was not successful because we did not give our colleagues the one vital piece of information which would eventually solve the puzzle. At the end of this list, we pretty much apologized to the “customer”, who, to make matters worse, is also a personal friend. Days went by and as I (Steve) tend to do, I obsessed over it, going over every detail over and over in my head.

We dropped in to see the friend socially several days later and of course conversation came back around to the slide situation and what to do about it at the end of the camping season when the slide would normally be retracted for winterization. It was then that the most eye-opening stroke of luck happened. My friend decided to check again to see if the slide was still stuck but pressed the wrong slide switch. The kitchen slide was also now stuck! We’d all been having drinks, so we all agreed we’d look into this further tomorrow. My first thought was that I’d somehow screwed up the kitchen slide while doing all the work on the living room slide, which is exactly across from it.

The next day, it was time to throw out the bath water, so to speak, and start on this with fresh eyes. This approach to solving this kind of elusive problem has worked in RV repair and every other endeavor since the very first time, decades ago, I realized I had duped myself with confirmation bias. I had decided there was something wrong with the slide mechanism and then bent everything I saw to fit that decision. With fresh eyes on the shocking evidence that now both slides were jammed, it was time to have a look around for a better opinion.

That’s when I finally saw the jack stands under the camper as a potential threat. These jack stands were sitting on extremely sandy ground, and it had been an unusually rainy spring. The stands were positioned at the very front and very back of the frame rails, potentially creating the maximum twist on the frame possible if they were to become uneven. We told our friends to get those jack stands out from under their camper and see how the slides behaved. If you guessed the problem was magically solved, you guessed correctly.

The question in the title, “Should you put your camper up on blocks?”, is misleadingly oversimplified. There are times when it’s a great idea and also times when it is a prelude to disaster. First, it’s important to understand the difference between putting supports under the frame rails and under anything else, especially under slide outs.

This might generate some hate but putting supports under slide out rooms is an absolute never, ever. The frame and walls are designed to have that weight permanently and the risk of even a minor shift in the supports, the ground, the position of the frame, or the tides of the ocean, can cause much more damage than “the weight of the slide out”. In short: STOP DOING THIS.

Second, supporting the frame can be a good idea if it meets three requirements. The supports must be equal, meaning exerting an equal force at every point they meet the frame. This may or may not be perfectly level if the frame is not perfectly plumb. It must be direct support with the jacks or blocks resting directly under the frame rail, not outriggers, suspension components, or crossmembers. The supports must not be able to move relative to each other. “Relative to each other” pretty much means the ground can’t sink leaving the supports out of balance in the force distribution on the frame. It was this last one that actually twisted the entire camper out of shape and trapped the slides in the walls in our friend’s case.

We hope you enjoyed our embarrassing story and took the two important lessons to heart. If you’re going to use supports, use them correctly, and much more importantly, never let an assumption overrule evidence.

Stay safe out there!

A remote control chip and receiver chip with voltage converters.

That Moment When You Realize There Was Never a Wire!

So far, this has to be the most interesting job we’ve ever done. The story has so many angles, it’s hard to decide where to begin. Because it’s sure to be a “too long didn’t read”, I’ll break it down into sections.

The Customer Concern

A very nice fellow staying across the campground from us at Buccaneer State Park in Waveland, MS, stopped by one day to ask us to have a look at his front furnace, which would not fire up. He had bought his 2006 Fleetwood motorhome from an estate and knew nothing of its past. The front furnace not firing might be related to something a little odd in plain sight.

The front air conditioner installed at the factory was a Coleman Mach configured as Zone 1 with a Zone 2 in the bedroom. It had been changed out for a Dometic at some point and a second thermostat installed for it. The thermostat was aware of the furnace, but the furnace would not activate. The owner believed the installation of the Dometic was in some way incomplete or faulty and wanted us to check it out.

The Purple Monkey

A “Purple Monkey” in the NRVTA world means basically a wild goose chase. We checked out the Dometic and everything had been configured properly for it to control the front furnace. However, the relay in the AC control box that should be connected to a wiring harness to send the 12VDC activation signal to the furnace was not connected to anything at all. The Coleman harness was still there, so it looked like all that needed happen was hooking up the usual wire and we’d be all set.

One should NEVER just apply voltage to a wire in an RV without verifying the wire isn’t shorted somewhere and actually terminates where you think it does. The good news: the wire wasn’t shorted to ground and had no voltage on it. The bad news: it also didn’t terminate anywhere near the furnace. A tone generator was able to “hear” the wire to somewhere near the edge of the roof, but then it just disappeared. We decided to trace it from the furnace up when we found the REAL problem.

Are You Serious?!

The furnace connection on this Atwood is a 6 pole plug which SHOULD have four wires on it: all 12VDC, positive house power, chassis ground (aka negative), power out to the AC control box, and a line in from AC control box. The wire coming back from the AC control box, which normally activates the furnace with 12VDC, was MISSING. We pealed back the vibration shielding on the umbilical to the slide out where the furnace was mounted and it wasn’t there either! Apparently, the factory forgot to include the wire in the lower section of the harness altogether.

We went outside and scoped the exhaust port, and sure enough, this furnace had NEVER been hot. It was basically brand new at 15 years old.

No Way It’s Worth It

Running a new wire inside a fully built coach is a nightmare. If it can be done at all, it takes a lot of time (hence expense) to do it. This job would’ve definitely been on the long side because it’s pretty much three separate jobs to get the wire from the roof to the wall, from the top of the wall to the bottom of the wall, and then out into the slide out. Just making it right would’ve cost hundreds (if not thousands). It was time to think outside the box.

What Are My Options?

  • Installing a third thermostat which only operated the furnace would’ve also taken a lot of time and the placement of that thermostat could not have been very effective in the floor plan of the coach.
  • A manual On switch that simply fired up the furnace by giving it the 12VDC signal is not necessarily a safe way to solve the problem. If the furnace’s thermal cutoff failed in the on position, it would definitely be a fire hazard.
  • Just don’t use it? The whole reason it became a concern is the owner planned more cool weather camping this year. Electric heat is good, but nothing compared to the power of propane.
  • Do something WAY outside the box. << This one!

Scotty, Beam Me a Furnace Activation Signal

I’d been cruising Facebook a few days before and just happened to get offered an Amazon ad for a pair of chips that use a 433MHz encrypted radio signal to activate something via a relay. The transmitter side of it is basically the guts of a key fob for power door looks. The receive side just knows how to open a small digital relay. This was the perfect time to go mad scientist!

We paired the little chips with voltage regulators to bring the house 12VDC power down to a friendly and consistent 9VDC. This step might have been unnecessary because the chip claimed its maximum voltage was 12. We know the alternator on a motorhome produces 14VDC and if the owner ever installed LiFePO4 batteries, they need 14.4V to balance the cells. We thought it best to spend the extra ten bucks on some cheap insurance and use regulators.

The remote control chip was powered up by running house 12VDC into one side of the AC control box heater relay. The other side of that relay powered the regulator which powered the chip and activated the radio signal.

The regulator for the receiver control chip was connected near the furnace to 12VDC house power through a kill switch mounted on the outside of the cabinet the furnace is hiding under. One side of the relay was also connected to the same 12VDC source (which the chip was rated to handle). The other side of the relay was wired into the furnace connector finally providing that fourth missing wire.

PRESTO!

It seems after all that, the conclusion should be more exciting, but it simply worked. The total cost of the project was around $150 including parts and our time to find and test the setup, a figure that was well worth it to the owner and vastly less than any other route to a solution.

We really enjoyed this project because the nerd factor was 11 out of 10. There are a few takeaways in retrospect:

  1. Never assume anything.
  2. Do the proper diagnostics if you want to avoid the dreaded Purple Monkey. We would’ve looked like idiots if we’d just tried replacing the furnace control board. Who knows, maybe the change to the Dometic AC was also an attempt to make that furnace work.
  3. Don’t just think outside the box, understand there IS NO BOX!

A Deeper Look in the Mirror

After writing up our website, we read the whole thing and realized it was missing something: the flavor of who we are and how much we love what we do.

Probably a reflection of happy childhood memories, we are absolutely passionate about camping, fellow campers, and the gear we all use to make it happen. We travel almost full time and sometimes we go to spectacular places like Glacier National Park. Those places are awe inspiring wonders, but they’re not enough to make full time RVing worth it.

If we are in a campground with you, you’ll see us out walking around any day weather permits. For us, the bigger splendor is in the people enjoying themselves and the vast array of rigs and campsite setups we see. It’s exciting to see classics still serving their owners, the latest and greatest straight off the dealer lot, rigs designed for a family with half a dozen kids, coaches built for two, and even the latest tent designs. Every single campsite is a little world of wonder to us as we walk by and often stop to visit.

The reason we travel so much isn’t the spectacular sights or even the geeking out on the vast array of RVs and camping toys. It’s the people we get to meet from all over the country and sometimes, all over the world. Everyone who camps seems to have some personality traits in common, each person expressing those traits in their own unique ways reflecting their own unique experiences and values. Learning about the people we meet and how their world is put together is the thing that keeps us out here on the road so much.

The vast majority of people we meet are:

  • Adventurous
  • Independent
  • Brave
  • Flexible
  • Adaptable
  • Smart
  • Thoughtful
  • Tough
  • Witty
  • Friendly
  • (and the list could go on)

It’s easy to see why these traits are common on the road. It takes all of that to get the most out of camping.

These traits are also why the best part for us is… you!

So We Did a Thing…

Today was a big day. For months we’ve wanted to break from the daily flood of work and recovery to lay down our little patch of Internet homestead by completing our website. Finally, after months with only a heartfelt letter to our visitors serving as more than a “Coming Soon” page but less than a website, Round Two is complete!

It was probably good fortune that made it take so long because when we formed this venture, we knew we’d need a website, but the correct contents of that site did not turn out to be anything we would’ve thought of at the onset. What has been compiled here in this release is basically the answers we give to the passersby who see the sign in the windshield and stop in to ask for help or just have a chat about what we do and what it’s like to do it the way we do.

As I sit here taking my personal victory lap for finishing things up, I can’t count the times we’ve told visitors and customers how to find repair techs when we’re not around. Almost as often, we’ve recommended products or told someone where to buy a part we don’t carry with us. Of course, people want to know what we can do and what our backstory is, but our biggest fear is that one of these awesome people would someday want to talk to us and not remember how to do it.

Finally, as the situations have unfolded, we’ve met amazing people with interesting challenges worth having on record. That’s what this From the Field journal is about. It’s kind of for us, but it’s also for those who might want to get more in touch with who we are and how we do things. We hope you like it.

Safe travels,
RV Tech 4 U