Professionally Cleaning an RV Rooftop Air Conditioner
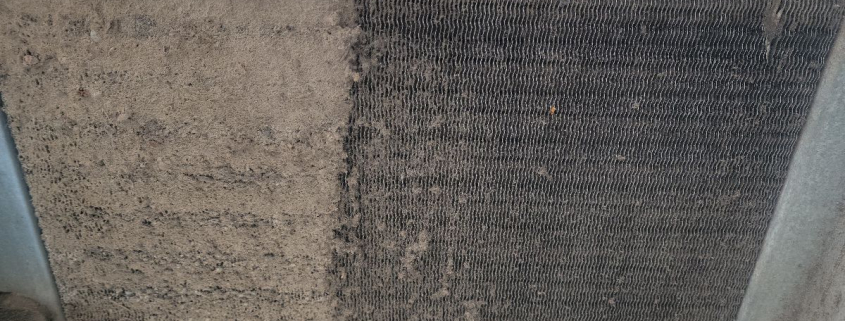
The picture attached to this post is what we found while servicing a rooftop air conditioner for someone who thought they were properly maintaining it. They stopped by to ask if the AC special we posted on our sign included “anything special” because every month during the summer, they washed the air return filters and sprayed off the condenser coil with a hose (without removing the outer cover). They were a little shocked to learn exactly how much is involved in a real semiannual AC service. The attached picture is of the evaporator coil, which is the coil you can see looking up through the air return on units with an exposed “bottom unit”. It obviously needed our help.
Here is a rundown of the things we clean and check when doing semi-annual maintenance on a rooftop air conditioner, regardless of brand. The list isn’t exhaustive because some units have extra features like condensation pumps which require extra steps.
- Remove the rooftop cover, remove any debris, especially wasp/dirt dauber nests. These pests can block airflow and airflow is everything.
- Measure the compressor amp draw at start and run. High loads can indicate impending compressor failure, low loads can indicate low refrigerant.
- Measure the “Delta T”, the difference between intake air temperature and cooled air temperature. This should be around 22 degrees in most cases, but if it’s higher than 30 degrees, it’s probably a sign of air leaking between the intake and cooled sides. If it’s lower than 20 degrees, it’s probably a sign of bad airflow through the unit. (These temperatures vary with humidity!)
- Measure the “Delta I”, the difference between the ambient air outside the intake, and inside the intake. A difference of more than 2 degrees means air is leaking between the intake and cooled sides and the leak must be found and taped or otherwise sealed.
- Inspect for oily residues. Refrigerant leaks leave behind the oil used to lubricate the compressor.
- Check the condenser fan blade spins freely. Fan motors have brushes and bearings which wear over time.
- Clean the condenser coil and straighten any fins which can be straightened without causing further damage. There are several no-rinse condenser coil cleaners on the market. Our favorite has a brush built into the cap which also helps to straighten fins. Every square inch of blockage or restriction adds up to loss of cooling efficiency and puts extra load on the fan and compressor.
- Remove the evaporator shroud, noting any gaps which would allow air to pass through the shroud. Remove any debris.
- Expose the capacitors then discharge, disconnect, and check tested capacitance against rating. Double check correct capacitors are installed. The best chance of saving a fan motor or compressor is to catch a failing capacitors as soon as possible. A bad capacitor will burn out a compressor given enough time. Replace any that are not up to spec.
- Clean the evaporator coil and straighten any fins which can be straightened without causing further damage. There are several no-rinse evaporator coil cleaners on the market. Our favorite is anti-fungal, anti-viral, anti-bacterial, and fresh scented. Just like the condenser coil, every square inch of blockage or restriction adds up to loss of cooling efficiency and puts extra load on the fan and compressor.
- Check the wiring connections. Loose connections can lead to arching which can start a fire, damage components, or cause intermittent function. Considering there is an earthquake/hurricane with every move, loose connections are more common than you might think. (This is also a great time to check the connections in the breaker box and other fire hazard locations!!)
- Replace the shroud, being extra careful to tape all gaps. A lot of factory installs will have a little piece of tape on the corners, but it’s just tape: tape the full seams!
- Clean or replace the air return filters inside.
- Retest the Delta T and Delta I to make sure everything is working properly. Under normal usage in just about all parts of the country, if the last cleaning was 6 or more months ago, there will be an improvement.
Of course, when we do it, we like to write up our findings so the owner can keep the health stats in their maintenance records. If you do this job yourself, pretend for a moment you’re issuing yourself a report, be detailed, and put it with your maintenance records. Being able to look back at prior tests for a trend is sometimes very helpful and having good maintenance records can also increase the value of your camper when it’s time to sell or trade!


Leave a Reply
Want to join the discussion?Feel free to contribute!